
News
Ningbo Haishu Arthome Cleaning Tools Co., Ltd. was founded in 1994, our factory has been dedicating to the design, development, manufacture and sale of cleaning products more than 31 years.
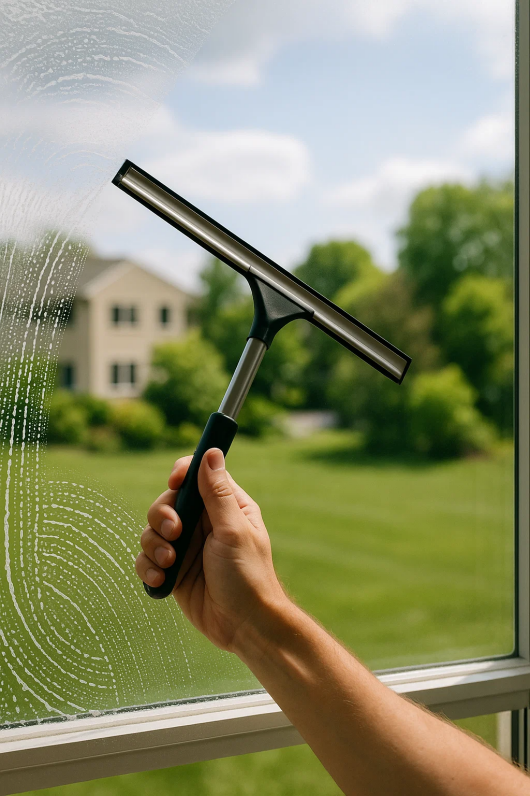
Clean windows not only enhance the appearance of your home or office, but they also improve the amount of natural light that enters your space, creating a brighter and more welcoming environment. However, achieving that crystal-clear, streak-free shine can often feel like a challenge. While there are various ways to clean windows—ranging from paper towels and sponges to sprays and cloths—there’s one tool that stands above the rest for delivering a perfect finish: the window squeegee.
A window squeegee is a must-have for anyone looking to achieve spotless, streak-free windows with minimal effort. Unlike traditional methods, a squeegee efficiently removes excess water and cleaning solution, leaving behind a smooth, clean surface. Not only does this reduce the chances of streaks, but it also speeds up the cleaning process, especially when compared to wiping with cloths or towels.
When it comes to choosing the perfect window squeegee, there are several factors that can make a significant difference in both the ease of use and the final result. To help you select the best squeegee for your needs, let’s break down the key elements that contribute to a high-quality squeegee: the rubber blade, handle design, squeegee size and width, durability, and maneuverability.
The rubber blade is the heart of a window squeegee, and its quality directly impacts the effectiveness of the tool. A high-quality rubber blade will ensure streak-free windows with minimal effort, while a subpar blade may leave behind smudges or watermarks. Here’s what to consider when evaluating rubber blades:
Sharpness and Flexibility: A blade that is too soft can create streaks, while one that’s too stiff may not conform to the contours of the window. Ideally, the rubber should be both sharp and flexible enough to glide smoothly across the glass, ensuring even pressure distribution and optimal cleaning.
Material: Most window squeegee blades are made of either natural or synthetic rubber. Natural rubber is often more durable, providing a longer lifespan, but synthetic options may be more affordable. Look for a blade that is resistant to wear and tear and will hold up against frequent use.
Replacement and Maintenance: Even the best rubber blades will wear down over time. It's important to look for squeegees that offer easy blade replacement. Regularly replacing the blade ensures that the squeegee continues to provide streak-free cleaning. To maintain your blade, rinse it after each use and store it in a dry place to prevent it from degrading.
The handle of the squeegee may seem like a secondary feature, but its design and ergonomics are crucial for comfort and control, especially during extended cleaning sessions.
Ergonomic Handles: A comfortable handle reduces strain on your hands and wrists. Look for handles with an ergonomic design that fits comfortably in your grip. Rubberized or cushioned handles are a great option for comfort and prevent slipping, ensuring a secure hold, even when your hands are wet.
Material: Handles come in various materials, including plastic, metal, and rubber. Metal handles (e.g., stainless steel or aluminum) are generally more durable and resistant to corrosion, making them ideal for frequent use. Plastic handles, on the other hand, tend to be lighter and more affordable but may not last as long under heavy use. Rubber-coated handles combine the benefits of comfort and durability.
Handle Type: Window squeegees typically come with either fixed or adjustable handles. Fixed handles are simpler and often lighter, making them ideal for small tasks or quick touch-ups. Telescopic handles, however, provide flexibility and can extend to reach higher windows, eliminating the need for a ladder. If you're cleaning large or multi-story windows, a telescopic squeegee is a wise investment.
Choosing the right size squeegee for the job is key to achieving efficient and thorough cleaning. The size of the squeegee impacts how much surface area you can cover with each stroke, as well as how easily you can maneuver it around the window.
Window Size: If you're cleaning large windows, a wider squeegee (18 inches or more) will help you cover more ground with each stroke. For smaller or more intricate windows, a smaller squeegee (around 10–14 inches) will provide better control and precision. Having a variety of sizes on hand is ideal, especially for tasks with both large and small windows.
Multiple Sizes: Many professionals use squeegees of varying sizes depending on the window type and the area being cleaned. For example, a small squeegee may be necessary for bathroom windows or French panes, while larger ones are better for expansive, flat glass surfaces. It’s worth investing in a range of sizes to ensure you can handle any job.
A good window squeegee should be able to withstand regular use without compromising performance. The materials used in construction contribute to its overall durability, ensuring it can handle frequent cleaning without wear and tear.
Stainless Steel and Aluminum: These are the most common materials used for the frame and handle of a high-quality squeegee. Stainless steel is known for its resistance to rust and corrosion, making it ideal for both indoor and outdoor use. Aluminum is lightweight and offers good durability, but it can sometimes be prone to scratches over time.
Plastic: While plastic is often used for more affordable, lighter squeegees, it can sometimes feel flimsy compared to metal options. However, high-grade plastic handles can still be quite durable, and many brands offer reinforced plastic designs that improve longevity.
Quality of Build: Look for a squeegee with a sturdy frame that won’t bend or warp easily, especially when applying pressure during use. A well-constructed squeegee should feel solid and balanced in your hand, with no loose parts or components that could become a nuisance during cleaning.
The weight of the squeegee affects how easy it is to maneuver, especially when cleaning windows that are out of reach or located at difficult angles.
Lightweight Designs: A lightweight squeegee is essential for ease of movement, especially when cleaning high or large windows. Lightweight models are less tiring to use and allow you to make longer, smoother strokes with less effort. However, make sure the squeegee remains sturdy enough to provide adequate pressure when cleaning.
Maneuverability: The more maneuverable a squeegee is, the easier it will be to clean around corners, edges, and tight spaces. Squeegees with swivel or adjustable heads improve maneuverability by allowing you to adjust the angle of the blade. This is especially useful for cleaning windows with irregular shapes or cleaning areas that are difficult to reach.
When it comes to choosing a window squeegee, the variety of options available can make it overwhelming to decide which one best suits your needs. Depending on the type of windows you need to clean, the environment, and how often you’ll be using the squeegee, certain models will work better than others. To simplify your decision-making process, we’ve broken down the most popular types of window squeegees, highlighting their features, benefits, and drawbacks.
Handheld squeegees are the most common and basic type of window cleaning tool. These squeegees feature a simple design with a rubber blade attached to a short handle. They are ideal for smaller or standard-sized windows and offer great control and precision during cleaning.
Pros:
Affordable: Handheld squeegees are generally the least expensive option, making them accessible for homeowners on a budget.
Portable: Their small size makes them easy to store and maneuver. They are ideal for cleaning windows in tight spaces or for quick touch-ups.
Easy to Use: The straightforward design means anyone can use it effectively with minimal training. It’s as simple as spraying the window and wiping it down with the squeegee.
Cons:
Limited Reach: Handheld squeegees are only effective for windows within arm’s reach. Cleaning larger windows, or windows on upper floors, can be more difficult and require ladders or other tools.
Fatigue: Extended use can be tiring, especially for large windows, due to the effort needed for consistent strokes and pressure.
Best For: Small windows, home use, touch-ups, and cost-conscious individuals.
Telescopic squeegees come with adjustable handles that can extend to reach high or hard-to-reach windows. This type is particularly useful for cleaning second-story windows, skylights, or large windows that would otherwise require a ladder.
Pros:
Extended Reach: Telescopic handles can extend anywhere from a few feet to 20 feet or more, allowing you to clean windows from the ground without needing a ladder.
Versatility: Some telescopic squeegees also come with interchangeable heads or attachments, which allows you to switch between squeegeeing and wiping or scrubbing in one go.
Safety: Because you don’t need a ladder to clean windows at height, telescopic squeegees improve safety and reduce the risk of accidents.
Cons:
Weight: Telescopic squeegees are often heavier than standard handheld squeegees, which can lead to fatigue during extended use.
Cost: These squeegees tend to be more expensive than handheld models, due to their additional features and longer handle design.
Storage: The extended handles may be cumbersome to store, especially if you have limited space.
Best For: High windows, large windows, professional cleaners, people who need to clean at height safely.
Swivel squeegees have a unique feature that allows the head to rotate, providing better maneuverability, especially when cleaning windows that are not flat. These are particularly useful for cleaning windows with angles or curves, such as shower doors, glass partitions, or automotive windows.
Pros:
Enhanced Maneuverability: The swivel head allows the blade to adjust its angle, making it easier to clean non-flat surfaces and corners without leaving streaks.
Better Coverage: The ability to adjust the squeegee’s angle lets you cover more surface area with fewer strokes, improving efficiency and reducing the chance of streaks.
Precision: The head's rotation gives you more control over the squeegee’s direction, which is crucial for detailed cleaning tasks.
Cons:
Potential for Loosening: Over time, the swivel mechanism can become loose or malfunction, especially if the squeegee is not properly maintained.
More Expensive: Swivel squeegees are generally more expensive than basic handheld models due to the added functionality.
Best For: Windows with irregular shapes, curved glass, automotive windows, shower doors, and those who want precision cleaning.
Magnetic window cleaners are a unique and innovative solution for cleaning both sides of a window simultaneously. This type of squeegee comes with two magnetic halves, each with a cleaning cloth or rubber blade, which attach to either side of the glass. When one half is moved, the other follows, allowing you to clean both sides of the window without the need for a ladder or scaffolding.
Pros:
Simultaneous Cleaning: The most significant advantage is that it cleans both sides of a window at the same time, making it highly efficient.
Safe for High Windows: You can clean windows from the inside without the need to climb ladders or scaffolding, reducing the risk of accidents.
Time-Saving: Since you’re cleaning both sides of the window at once, you can save time, especially with large or multi-paned windows.
Cons:
Limited to Thin Glass: Magnetic window cleaners only work on windows that are not too thick (typically under 6mm). They won’t work well with double-glazed windows or very thick glass.
Not Ideal for All Shapes: Magnetic cleaners are best suited for flat glass surfaces. They can be difficult to use on windows with frames, grilles, or intricate designs.
Potential for Scratches: The magnets can sometimes leave behind dirt or debris that could scratch the glass, especially if the cleaner isn't used with caution.
Best For: High-rise buildings, cleaning large windows from the inside, people who want a more automated, efficient cleaning process.
Professional-grade squeegees are typically used by window cleaning experts or commercial cleaners. These squeegees are designed for heavy-duty use and offer superior performance, durability, and comfort. They often feature high-quality rubber blades, strong metal or aluminum frames, and ergonomic handles that provide exceptional control.
Pros:
Durability: Professional squeegees are built to last and can withstand frequent use, making them a good investment for commercial cleaners or people with a large number of windows to clean.
High-Quality Blades: The blades are often made from premium rubber that resists wear and tear and ensures streak-free results.
Comfort: Many professional-grade squeegees come with ergonomic handles and long-lasting materials that reduce strain during extended cleaning sessions.
Cons:
Expensive: Due to their high-quality construction, professional window cleaning squeegees tend to be more expensive than consumer models.
Heavy: These squeegees can be bulkier, which might be inconvenient for casual users who are only cleaning windows once in a while.
Best For: Professional window cleaners, large commercial spaces, or people who clean windows regularly and need a durable, high-performance tool.
Cleaning windows with a squeegee is the most efficient way to achieve a streak-free, professional-quality shine. Whether you're tackling large glass windows or small panes, a squeegee allows for fast, thorough cleaning with minimal streaking. However, for the best results, it's crucial to follow the right technique and prepare adequately. Below is a comprehensive, step-by-step guide to cleaning windows with a squeegee, along with tips and tricks for optimal performance.
Before you start cleaning, gather all the necessary supplies. Proper preparation will ensure you get the best results and avoid wasting time in the middle of the task.
What You’ll Need:
Window Squeegee: Choose the right squeegee size and type for the windows you plan to clean.
Cleaning Solution: You can either buy a commercial window cleaner or make your own. A simple DIY solution includes mixing equal parts of water and vinegar, or water with a few drops of dish soap.
Bucket: Fill it with the cleaning solution or warm water.
Cloths or Towels: Microfiber towels or lint-free cloths are ideal for drying the window edges and wiping off the squeegee blade.
Extension Pole (if necessary): For higher windows, especially if using a telescopic squeegee.
Step Ladder (optional): If you're cleaning windows that are out of reach.
Preparation Tips:
Clear the Area: Remove any furniture or objects that might get in the way or get splashed by water.
Check the Weather: Avoid cleaning windows in direct sunlight, as this can cause the solution to dry too quickly, leaving streaks. Overcast or cloudy days are ideal for window cleaning.
Protect the Surroundings: Lay down towels or drop cloths near the window to catch any drips or cleaning solution.
Once you're ready to begin, apply the cleaning solution to the window’s surface. This step is essential for loosening dirt, dust, and grime, so the squeegee can glide smoothly.
How to Apply the Solution:
Use a spray bottle to apply the cleaning solution evenly across the glass. Start at the top of the window and work your way down.
Alternatively, you can dip a clean sponge or cloth into the solution and wipe the window surface.
Ensure that the entire glass area is covered with the cleaning solution, especially in corners and edges.
Tip: If you're cleaning a particularly dirty window, allow the cleaning solution to sit for a few seconds to help loosen grime before proceeding.
Now that the window is prepped, it’s time to start using the squeegee. The key to a streak-free finish is using the correct technique.
How to Use the Squeegee:
Position the Squeegee: Start at the top of the window, with the squeegee blade angled at about 30 to 45 degrees. The handle should be held comfortably in one hand, while the other hand will guide the movement.
Make the First Stroke: Pull the squeegee down in a straight line. Keep the rubber blade in contact with the glass at all times and apply even pressure to ensure consistent results. Try to maintain a steady angle, as too much tilt can cause streaks or uneven cleaning.
Wipe the Blade: After each stroke, wipe the squeegee blade with a clean cloth to remove excess water and dirt. This ensures that you aren’t re-depositing dirt onto the glass with each new stroke.
Tip: For vertical strokes, start at one side of the window and work your way to the other side, overlapping slightly with each stroke. This helps prevent streaks by ensuring a smooth flow of water.
To achieve the best results, you can alternate between vertical and horizontal strokes, depending on the window’s size and shape.
Vertical Strokes:
For larger, rectangular windows, vertical strokes are often the most efficient. This method allows you to cover a broad area and keeps the water from pooling at the bottom of the window.
When using vertical strokes, be sure to overlap each stroke slightly to prevent streaks and ensure uniform cleaning.
Horizontal Strokes:
Horizontal strokes can be particularly useful for smaller or square windows, where precision is key. Start from the top and work your way down.
For windows with narrow or tricky areas, horizontal strokes allow you to clean in manageable sections, ensuring every part of the window is spotless.
Circular or “S” Strokes:
Some experts recommend using a combination of circular and “S” strokes for very dirty windows. Start by using circular motions to break up the dirt, then finish with straight strokes to remove excess water.
Once you've squeegeed the entire window, the edges and corners may still be wet. To avoid streaks in these areas, use a dry cloth or towel to wipe away any excess water or solution.
How to Dry the Edges:
Use a clean, lint-free cloth to wipe around the perimeter of the window. Make sure to dry the corners and edges, where water tends to accumulate.
Be gentle to avoid pushing any water back onto the glass.
Tip: A microfiber cloth is ideal for this step because it’s highly absorbent and won’t leave behind lint or streaks.
After completing the cleaning process, step back and carefully inspect the window for any streaks or missed spots.
How to Spot Streaks:
Check the window in different lighting conditions to ensure that you haven’t missed any spots or left streaks behind.
If you do notice streaks, use a clean, dry cloth to wipe them away. Alternatively, you can re-squeegee the area with a light touch.
Tip: If your windows are particularly prone to streaking, consider using a window-specific cleaning solution with anti-streak properties. Alternatively, add a bit of rubbing alcohol or vinegar to your cleaning solution to help prevent streaks.
To ensure your squeegee performs at its best every time, it’s important to clean and maintain it regularly.
Squeegee Maintenance Tips:
Clean the Blade: After each use, wipe down the rubber blade with a clean cloth to remove excess cleaning solution and debris.
Inspect the Blade: Periodically check for any cracks, nicks, or wear on the blade. Replace the blade as necessary to ensure streak-free results.
Rinse the Handle: The squeegee handle can accumulate dirt and cleaning solution over time. Rinse it with water to keep it clean and functioning smoothly.
Choose the Right Cleaning Solution: Avoid harsh chemical cleaners, as they can leave behind residues that cause streaking. A mixture of vinegar and water, or a dedicated window cleaning solution, works best.
Use Proper Pressure: Too much pressure can damage the glass or lead to streaks, while too little pressure may not effectively remove the dirt. Find a balance that works for you.
Work in Sections: For larger windows, break down the cleaning process into manageable sections to avoid cleaning too large an area at once, which could lead to streaking.
Clean in Optimal Conditions: Avoid cleaning windows when it’s windy, rainy, or extremely sunny. The sun’s heat can cause the cleaning solution to dry too quickly, leaving streaks behind.
Use Multiple Cloths: Keep a few microfiber cloths on hand to wipe the squeegee blade between strokes, dry the edges, and touch up any missed spots.
Achieving perfectly clean, streak-free windows isn’t always as easy as it seems. Whether you’re a seasoned window cleaning pro or a homeowner cleaning your windows for the first time, it can be frustrating when streaks appear after all that hard work. Fortunately, with the right techniques, tools, and knowledge, you can consistently achieve that sparkling, streak-free shine. Here are some expert tips and tricks that will help you clean your windows to perfection every time.
The cleaning solution you use can make all the difference in achieving streak-free windows. Many commercial window cleaners contain harsh chemicals that can leave behind a residue or streaks. Fortunately, you can make your own cleaning solution that’s effective and streak-free.
DIY Window Cleaning Solution:
Vinegar and Water: One of the most popular DIY solutions is a mixture of 1 cup of white vinegar to 1 gallon of warm water. This natural combination cuts through grease and grime without leaving streaks.
Dish Soap and Water: A few drops of mild dish soap in a bucket of warm water will create a gentle yet effective cleaning solution. Avoid using too much soap, as this can leave behind a film.
Alcohol-Based Solution: For extra shine and a streak-free finish, add a small amount of rubbing alcohol (about 1/4 cup) to your cleaning solution. The alcohol helps to break down any greasy residues and accelerates drying time, reducing the likelihood of streaks.
Commercial Cleaning Solutions:
If you prefer a store-bought solution, look for ones that advertise streak-free results or are specifically formulated for glass cleaning. Some products contain ammonia or alcohol, which help dry the glass quickly and leave no residue.
Tip: Avoid using ammonia-based cleaners on tinted windows, as they can cause the tint to degrade over time.
It might be tempting to clean your windows on a sunny day, but direct sunlight can cause the cleaning solution to dry too quickly, leaving behind unsightly streaks. The key to streak-free windows is working in optimal conditions.
Best Time to Clean Windows:
Overcast Days: The ideal time to clean windows is on an overcast or cloudy day when the sunlight won’t cause your cleaning solution to dry too fast. This allows you to clean the windows without worrying about streaks or residue.
Morning or Evening: If you must clean on a sunny day, try to do it early in the morning or later in the evening, when the sun is less intense. Avoid cleaning windows when they’re exposed to direct sunlight, as this can cause uneven drying.
The type of cloth you use to wipe down your windows plays a significant role in the final result. Traditional towels or rags can leave behind lint, streaks, or fibers, while microfiber cloths are designed to be highly absorbent and lint-free. Microfiber is also gentler on the glass, making it perfect for delicate surfaces.
Benefits of Microfiber Cloths:
Lint-Free: Unlike cotton towels or rags, microfiber cloths leave no fibers or lint behind, ensuring a flawless finish.
Highly Absorbent: Microfiber can hold several times its weight in liquid, allowing you to dry your windows more efficiently.
Streak-Free: Microfiber is designed to trap dirt and moisture without pushing it around, which helps eliminate streaks.
Tip: Use two microfiber cloths: one to wipe the squeegee blade and another to dry the edges of the window. This prevents re-depositing dirt onto the glass.
The cleanliness of your squeegee blade is essential for streak-free windows. If your squeegee blade collects dirt, dust, or excess solution, it can drag these particles across the glass, leaving behind streaks or smudges.
How to Clean the Squeegee Blade:
After each stroke, wipe the blade with a clean microfiber cloth to remove any residue or moisture.
If you notice the squeegee leaving streaks, it might be time to clean the blade with warm, soapy water.
Check for Nicks or Wear: Over time, the rubber blade of the squeegee can wear down or become damaged, causing streaks. Inspect the blade regularly and replace it if necessary.
Tip: If you’re using a telescopic squeegee, be sure to clean the blade between strokes, especially when working on larger windows or at height, to maintain performance.
The way you move the squeegee can significantly affect the final outcome. Even with the best tools and cleaning solutions, improper technique can lead to streaks or missed spots.
Proper Squeegeeing Technique:
Angle the Blade Correctly: Hold the squeegee at a 30 to 45-degree angle to the glass. This angle allows the rubber blade to make full contact with the glass and removes moisture effectively.
Work from Top to Bottom: Always start at the top of the window and move downward. This prevents dirty water from dripping down onto already cleaned areas.
Overlap Strokes: When making multiple strokes, overlap each stroke slightly to avoid leaving streaks in the middle. The key is to create a seamless pattern.
Use Smooth, Steady Strokes: Avoid jerky or uneven strokes. Make smooth, steady movements to ensure the cleaning solution is evenly spread and removed.
Clean the Blade After Every Stroke: After every stroke, wipe the squeegee blade with a clean cloth to ensure you aren’t re-depositing dirt and water back onto the glass.
Tip: If your window has a large surface area, divide the window into sections and work on one section at a time. This gives you more control and minimizes the risk of streaks.
The edges and corners of your windows are where water and solution tend to collect, and they can often be the first place where streaks appear. Don’t neglect these areas!
How to Clean the Edges:
After squeegeeing the main area of the window, use a microfiber cloth or towel to wipe the edges and corners of the window.
Be gentle around the edges to avoid pushing any water back onto the glass. You can also run the microfiber cloth along the perimeter of the window to clean up any water droplets.
Tip: For tough spots or corners, use a small detailing brush or an old toothbrush to remove grime before cleaning.
Hard water stains can be a challenge when cleaning windows, especially if you live in an area with high mineral content in the water. These stains occur when water evaporates and leaves mineral deposits behind, which can be difficult to remove with regular cleaning.
How to Remove Hard Water Stains:
Vinegar Solution: Spray a mixture of 1 part vinegar and 1 part water directly onto the hard water stains and let it sit for a few minutes. The acidity in the vinegar breaks down the minerals, making it easier to wipe away the stain.
Commercial Hard Water Remover: If vinegar doesn’t do the trick, you can use a store-bought cleaner designed for removing hard water stains. Just make sure it’s safe for use on glass surfaces.
Baking Soda Paste: For more stubborn stains, mix baking soda and water into a paste and apply it to the affected area. Let it sit for 10-15 minutes before scrubbing gently with a sponge.
Tip: Always wipe hard water stains in one direction (either up and down or side to side) to avoid creating new streaks.
If your windows are particularly dirty or have built-up grime, a two-step cleaning process will give you the best results.
Step 1: Scrub the Glass
Use a soft scrub brush or sponge to scrub the window with your cleaning solution. Focus on areas with visible dirt, fingerprints, or smudges.
Step 2: Squeegee the Window
After scrubbing, use your squeegee to remove the cleaning solution. Work from top to bottom, making smooth strokes, and follow the tips mentioned earlier.
The best way to keep your windows streak-free is by cleaning them regularly. If dirt, dust, and water stains are allowed to accumulate over time, it becomes harder to clean, and streaking becomes more likely.
How Often to Clean Windows:
Indoors: Clean windows inside your home every 2-3 months, or more frequently if you live in a dusty environment.
Outdoors: Exterior windows should be cleaned 2-3 times a year, depending on the weather conditions and local environment.
1. Understanding Hardwood Floors and the Need for a Specialized Floor Flat Mop Hardwood floors are a timeless addition to any home, providing warmth, elegance, and a sense of natur...
View MoreIntroduction Clean windows not only enhance the appearance of your home or office, but they also improve the amount of natural light that enters your space, creating a brighter and...
View MoreIntroduction to Microfiber Cleaning Cloths What Are Microfiber Cleaning Cloths? Microfiber cleaning cloths are specialized cleaning textiles made from ultra-fine synthetic fibers. ...
View MoreWhat is a Sweeper Mop? A Sweeper Mop is a modern household cleaning tool that cleverly combines the functions of a broom and a mop. In short, it allows you to sweep and mop at the ...
View More
Taoyuan Village, Hengjie Town, Haishu District, Ningbo City, Zhejiang Province, China.

+86-18758322291

sales1@nbarthome.com


